Monday, September 12, 2011

Benches and lockers


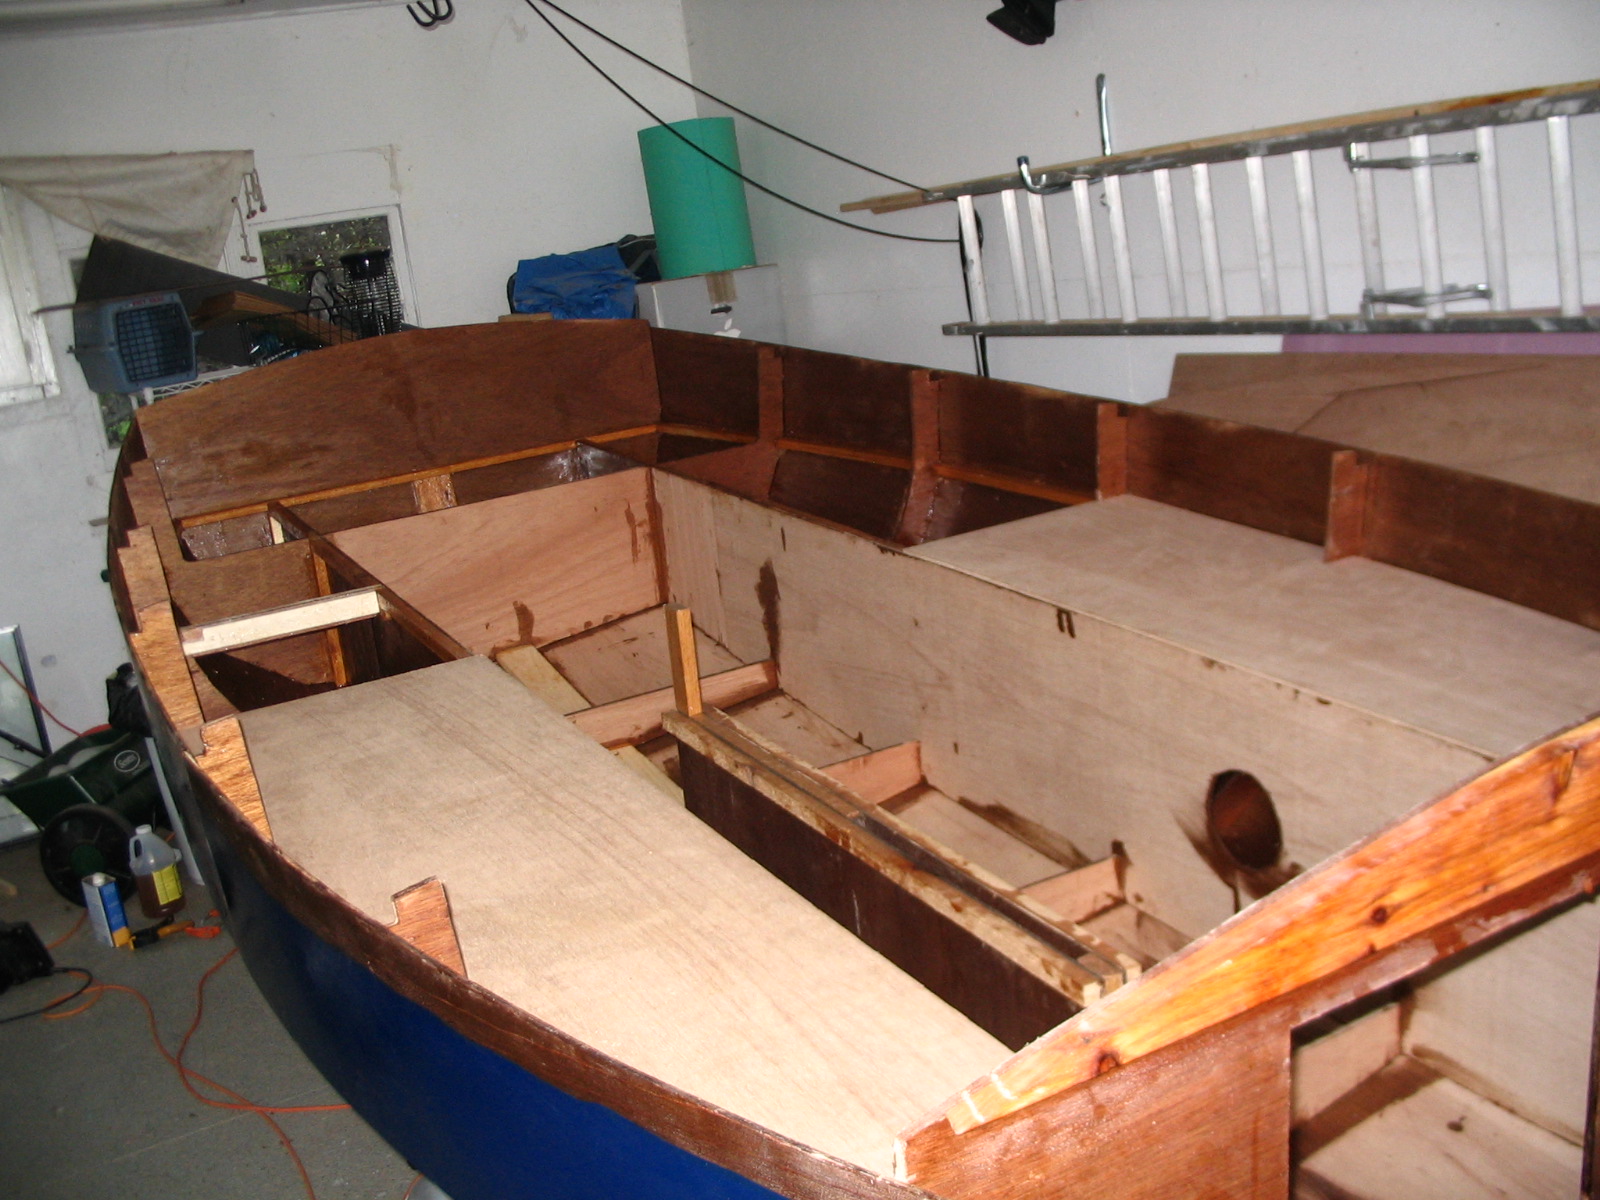
The past week I continued to work on the inside of the boat: seat tops and locker doors.  On the left you can see all the pieces (10 of them) all fitted quite precisely: four long seat tops, three hinged flip-up locker doors, and three backing pieces (between the doors and the sheer strakes and transom).  In the next photo you can see two of the brass hinges laid on for fitting.  There is still some work to do before putting on the hinges: another coat of epoxy on the insides of the benches, two coats on the undersides of the seats, and reinforcements glued on the undersides of the locker doors.  I just didn't feel like messing with epoxy for a change and concentrated on sawing.

I also cut the sliding door for the fore locker (see photo), which will be between the fore bulkheads.  It will slide on wooden runners set horizontally into the main bulkhead.

Finally, I designed, drew and cut the three distinct pieces of the rudder: the piece attached to the tiller and transom, the pivoting blade that will be in the water, and the jaws that hold them together.  It was very tricky (at least to me, with this being my first effort at boat design) to make sure the moving parts  pivot against each other, and I arrived at it without copying anybody else's specific design.  I will need to cut another identical set to laminate all together.  I will also have to decide whether to use lead or a bungee cord to keep natural buoyancy from flipping up the pivoting blade.  I am inclined to give dealing with molten lead a pass!

As for what comes next, you read it before: more smelly, messy epoxy coatings and gluings.

Until then,  I remain your friend
boatbuilder

Sunday, September 4, 2011

Seats and cabinetry


The last couple of weeks have involved putting the curves on forward bulkheads and transom, and working on the inside of the boat, something that is very picky and borders on cabinetry.  I am building three flip-up doors into the seat tops, which means putting in supports and framing, joints etc.  After cutting all the pieces from aspen (door frames), plywood (reinforcements) and pine (the rest), putting in all the notches, etc., I put one coat of epoxy on the the entire inside of the boat, except the bottom (too hard to reach for now, plus there's no hurry) and the outsides of the seat risers (also hard to reach, and I need to do a careful job since they will be visible and left unpainted, with epoxy and varnish).  In the process I had one more episode of the epoxy overheating and solidifying too early (yesterday was a very hot day).  So now I am keeping the epoxy containers in the fridge, at least part of the time.

I then cut seat tops (see above for forward half), except where the doors will go, and notched them for the frames.  This is harder than it sounds, since the frames are not exactly square.  I also made my first measuring and cutting mistake, which left a gap about 10 mm wide (about 3/8 inch) over part of one seat stringer, on the sheer side.  Not wanting to waste plywood, and given that I don't have much to spare, I will fill it with a thin sliver of ply and epoxy fillet.

Today I glued all the framing pieces (see detail from aft seat/storage area--the crosspiece is not in yet).  Next the inwales will be glued in.  Then the seat tops will be epoxied on the inside, and reinforced where needed.  After a second coat of epoxy on the inside of the seats, the tops will go on, including hinging the doors.  The next step will be braces for the side decks. 

Cheers,

boatbuilder


Wednesday, August 24, 2011

Flippin' pix

As promised, here are the pictures of the boat flipping, in order.  You can admire the glossy finish, or the lightness of the hull, or the beautiful lines (if I may say so myself).  Or not.

Since then I haven't done much on the boat, but I spent a wonderful weekend in Cleveland (yes, you read that right) with my wife and daughters.  It the past few nights I mostly cut the curves into the fore bulkheads, and it's so hard and awkward that I wish I had done it earlier, but you live and learn.  I still have to sand the tops smooth.  I also fit and trimmed the inwales--once again one of them broke, at a knotty spot.  I glued it back together and cut a few shallow kerfs to prevent it happening again.  They are now ready to glue in place.  I hope to make a lot of progress in the next two weeks, while my wife goes to see her mother again (hurricane Irene permitting).

Meanwhile, keep reading 176inches (which, with the bow trim--or false stem as some call it--and curved transom, will be closer to 179 inches in the end).

boatbuilder


Sunday, August 14, 2011

Flippin'

This past week I gave the hull a couple of coats of paint, which made it very shiny and made the small flaws stand out even more, but as I said before I don't care.  Finally, on Sunday afternoon I marshaled together four other guys (thanks, Carl, Chris, Gregg, and Paul!) and we flipped it over (right side up) from the building frame to the trailer.  Before doing that I removed the nails that secured the boat to the frame, and rigged together a safety system of ropes running through eyebolts screwed into the garage walls.  Here I am with the rope system in the "before" picture.  You can see everything being reflected in the super-glossy paint. 

It turned out to be utterly unnecessary.  Two people can lift the boat hull with great ease, and using the ropes would have meant doing the flipping inside the garage.  Seeing that the boat's beam is almost six feet, that would have been awkward (it would have hit the garage door opener overhead).  The guys therefore decided on the spot to ignore the ropes, lift the hull, walk it outside and flip it manually.  It took almost no time.  It was a revelation to finally see the inside, after only a few glimpses while clambering underneath.  Ah yes, and it became clear that the trailer is too small.  Designed for a personal water craft, the trailer is fine for my little 11' 6" (3.26 meter) first boat, the good ship Robin.  But Aerie is 15 feet long, and the trailer, while fine as a building platform, will not be safe enough on the road.  You can see two "after" photos, inside and out.  By the way, the strip at the sheer was left unpainted to receive the 2-inch-wide oak rubrails.  Next I will be giving the inside a coat of epoxy, gluing in the inwales, filleting some seams, and putting in the bench tops.

So, I hear you say, where are the "during" pictures?  Well, my camera ran out of juice at the wrong time.  Fortunately, my daughter Georgia is visiting from San Francisco, and she took some great photos with her camera.  Unfortunately, she didn't bring the little USB cable so I can't upload them.  We'll have to wait until she goes back and e-mails the photos.  So, as usual,

keep checking 176inches!

boatbuilder

Sunday, August 7, 2011

Epoxy and paint

 The past week has been devoted to filling, puttying,  sanding and coating with epoxy.  As I've already confessed, sanding is my least favorite activity, so a purist would be able to look around and find many small flaws.  I don't care.  After many passes of setting nails, filling with filleting compound, sanding, more filling, more sanding, etc., then some final spot touching up with wood putty, then more sanding, came the time to call a halt to it and coat with epoxy.

Word to the wise: working with filleting compound (epoxy mixed with wood flour) is a pain.  It starts getting stiff very soon, and requires a lot of sanding afterwords.  If it is allowed to cure for more than 48 hours, it's very hard to sand level to the wood.  On the other hand, it's extremely strong and adds to the structural integrity of the boat.  The scarfed joints of the strakes, 8 in total, benefited a lot from filleting compound, since they were far from perfect to begin with.  With a bit of wood putty at the end they will be completely hidden once the paint goes on.

So here is the boat after the second and final coat of epoxy, which has brought out the beauty of the wood and gleams blindingly.  Too bad it will be covered with paint, but it gives an idea of what the inside parts (benches, lockers, thwart, floor, splash guards, CB case), which will be left natural, will look like.

This coming week I will give the hull two coats of paint, after some light sanding.  Then I will flip the boat right-side-up onto its trailer (which I hope will be big enough) so I can work on the inside.  The flipping will be done with a few friends and neighbors, perhaps with the aid of a canoe hoist that I attached to the ceiling of the garage years ago.  I promised to pay them in beer.

So check 176inches in a week or so for more pictures and stuff.

boatbuilder

Wednesday, July 27, 2011

Skeg, keel and all

I spent the last two weeks mostly doing things that are neither glamorous nor spectacular, namely trimming strakes and filling seams with filleting compound (epoxy and wood flour).  Then in the last few days I put on the skeg, keel and bow trim.

The skeg (on the right) was cut and laminated from two layers of 3/8 inch (9mm) plywood.  It was screwed and glued on with some difficulty (and with my wife's help), since I had to duck under the boat and drive the screws from below through the keelson.  Once that was done, I reinforced the bottom of the skeg with a 3/4 x 1 inch length of solid oak. 

Then I screwed and glued a strip of 3/4 x 1 inch oak along the rest of the boat's bottom.  It's a little small to call it a keel, but really that's what it is--a sacrifice keel to be precise.  It's there mainly to stop rocks and other stuff damaging the bottom.

Then I put on the bow trim.  As I said before, the bow was angular, so I used the trim to give it a nice rounded shape (left).  This I achieved with two 3/4 x 1 inch pieces and one 3/4 x 2 inch piece.  The latter was the one that was cut and sanded to achieve the necessary curvature.  Skeg reinforcement, sacrifice keel and bow trim were all secured with bronze screws from the outside.  They are recessed and the holes will be filled along with all other holes, gaps and blemishes.  Throughout I was once again reminded of how hard oak is, with several screws inevitably getting stripped or broken.

The final photo shows the entire boat.  It is ready for recessing the last nails (I have done over half), filling all holes etc., sanding, two coats of epoxy and two coats of paint.  I chose the most standard paint I could find (which happens to be one of the cheapest too): Rustoleum topside boat enamel, navy blue high gloss for the bottom, white semi-gloss for the fore and side decks.  The inside will stay natural with spar varnish.  I am not using bottom paint, since the boat will be trailered and does not need protection against gunk growing on it while sitting in the water.  The colors were chosen to reflect the colors of the Greek flag, and they are (along with the brand of paint) standard and ubiquitous: fancier paint is less likely to be around when I need to repaint the boat.

So there we have it.  Next time the plywood and oak will look smooth and uniform in their gleaming epoxied form,  and after that shiny and positively naval in blue paint.

Until then, keep checking 176inches.

boatbuilder


Tuesday, July 12, 2011

Back from Greece

The last two weeks I was in Greece, mostly on vacation but taking care of some family business too (as usual).  So I didn't do any work on the boat but heck, I needed the vacation and the inspiration to continue, since the plan is to take the boat there when I retire (eventually).  It will obviously cost far more to ship it than to build it, but if it's part of a half-containerload of stuff we may be moving anyway I'll be able to justify it.

There was plenty of inspiration from the beautiful beaches and the sea, which ranges in color from the purest, palest aquamarine to the deepest indigo, depending on depth, weather and what's on the bottom.  When crossing on the ferry I am always reminded of Homer's frequent reference to sailing "on the wine-dark sea" (epi oinopa ponton).  This is very appropriate since the island has had a reputation since early antiquity for superlative wine.  The house we built for our retirement sits on what used to be a vineyard for three generations, up to my grandfather who passed away in 1963.  He was a Greek Orthodox priest and my strongest memories of him are olfactory: a mixture of incense, sweat (from toiling in the fields in a black cassock) and ouzo, which he distilled in copious quantities and partook of in moderation.

While swimming at a different beach every day, I was always aware of wind and wave and made mental calculations of  what it would be like to hop from beach to beach.  The island's circumference is about 60 miles, with dozens of beaches, many more-or-less inaccessible by car.  However, I didn't get much inspiration from other sailors.  I am in my fifties but I do not remember seeing a single traditional boat with sails when I was young: motors had already eclipsed sails.  The occasional sailing yacht makes an appearance but none seem to be from the island.  What I did see was perhaps the sorriest spectacle of lubberly incompetence I had ever seen, in what is arguably the most stunning cove and beach on the island.  A group of tourists (from some Balkan country by the sound of them) had rented a sweet little catamaran built on inflatable pontoons.  Using a large outboard they moved it from its mooring, through the swimmers (I almost called the police for the brazen breach of safety) to the beach.  There they proceeded to hoist the mainsail (a tall, narrow, fully-battened Mylar affair) and unfurl the jib.  Then they used the outboard to move part way up the cove, cut the motor and started sailing straight for the rocks.  Clearly they had no more than a vague idea about how to tack, and I suspect that they hadn't even deployed the very small centerboard.  They brought the jib over but did not put the helm to the lee, or the helm did not obey.  In the nick of time they fired up the outboard and managed to exit the bay.  Then they spent the next hour or two making approximately 20 feet of headway, until they ran out of patience and motored back in.  All in all, a waste of boat, wind, water and beautiful scenery.


Hopefully my boat will do better in that setting.  BTW, I thought of calling it Aerie (every one of the four vowels is pronounced separately in Greek), after a Homeric name for the island which means airy or breezy.  I may be mixing Ionic and Attic dialects of ancient Greek in spelling it thus, but I like the sound, look and concept of the name.  We'll see.

This coming weekend I'll be resuming my work, so keep checking 176inches.

boatbuilder