I’ve been quiet for many months. Between travels, lots of work pressure and a
winter that will enter the history books for its horribleness, progress on the
new rig had been slow. Given what the
spring has been like for far too long (last I checked Lake Erie still had some
ice!), there was no real hurry. In a
brief interval between blizzards and polar temperatures (in my unheated garage
epoxy will not cure in very cold weather), I managed to put two coats of epoxy
on the new mast and bowsprit, and shaped and glued/screwed oak pad eyes at the
mast top to anchor the shrouds and forestay.
Then I made the new sails.
The methods of construction are the same as he ones I used for the sails
of the original rig, and include luff and head tape plus reinforcing
multi-layer patches and/or tapes in a total of thirteen places (7 corners and 6
reefing cunninghams). Of course the
sails are different. The mainsail is
about 85 square feet (7.9 m2), and that’s much larger than anything
I have ever made before. It’s a
trapezoid roughly 8 feet (head) by 8 feet (luff) by 11 feet (foot) by 15 feet (leech). It has two rows of reefing points (made with
grommets this time, since buttonhole sewing is really tiresome), and several
grommets along the luff to attach it to the mast with line and dowel
toggles. Curvature was built in with a
dart starting at the tack, and with broadseaming (variable overlaps in the
seams).
The jib is roughly 12.5 feet (luff) by 6.5 feet (foot) by 10.5
feet (leech), which works out to about 35 square feet (3.25 m2). It has one set of reef points and a small
dart starting at the tack. It will be
attached to the forestay with plastic jib hanks. I will show photos when the sails are up.
The next step was to finish the new spars with two coats of
varnish. Then came the standing rigging,
something the original masts did not have—simple but weak, as I found out to my
regret. I first attached anchor plates
to the gunwales, gluing squares of oak just below the rubrails and driving
heavy duty steel screws through to the frames.
Turnbuckles for tightening the standing rigging were added to the anchor
plates. Two steel pad eyes were bolted
through the tip of the bowsprit as well.
Then I ventured into the totally uncharted territory of making the
shrouds and forestay out of Amsteel Blue rope.
To secure them to the mast, hull (shrouds) and bowsprit (forestay) I had
to make eye splice loops; large ones to go around the mast top at the top end,
small ones to go around thimbles at the lower end. There was a line that anchors the bowsprit tip
to the bow as well, and it needed two more eye splices around thimbles. I thought it would be fun to learn a
different way of splicing, the so-called “long bury” type: it involves tapering
the working end of the rope (by unraveling and cutting of half the strands),
then pulling it down the inside of the standing part. The rule of thumb is that the buried tail
needs to be 72 times the diameter of the rope, or 9 inches for 1/8 inch rope. This makes an eye loop as strong as the rope
itself.
 The
eight eye splices took many hours, mostly of self-training with trial and
error. I finally settled on a method
that uses a length of thin wire folded double to pull the tail end of the line
through the middle. Once I got that to
work on the first splice, the rest were much easier. The top loops that go around the mast have
hollow rope sleeves around them to protect from chafing. All eye splices are strengthened (serviced)
with heavy-duty waxed thread. Advice
for would-be splicers: make sure you leave extra rope, since the buried tail
thickens and shortens the rope where the splice is. I didn’t leave quite enough and had to work
hard to make sure the shrouds were not too short.
The
eight eye splices took many hours, mostly of self-training with trial and
error. I finally settled on a method
that uses a length of thin wire folded double to pull the tail end of the line
through the middle. Once I got that to
work on the first splice, the rest were much easier. The top loops that go around the mast have
hollow rope sleeves around them to protect from chafing. All eye splices are strengthened (serviced)
with heavy-duty waxed thread. Advice
for would-be splicers: make sure you leave extra rope, since the buried tail
thickens and shortens the rope where the splice is. I didn’t leave quite enough and had to work
hard to make sure the shrouds were not too short.
The first photo shows the shrouds and forestay loops through their pad eyes with the white rope sleeves. It also shows the throat halyard block on its spliced line loop and the peak halyard block on a steel eye strap bolted through the mast top. The second shows the hardware at the tip of the bowsprit and the line that goes to the bow, with its two thimbles and eye splices.
The next post will be about the running rigging.
boatbuilder
 The next thing was the gaff.
An eyebolt was put through the throat for clipping the throat halyard
on. A metal strap bent into a U-shape
and attached to the underside of the eyebolt was used to secure the mainsail’s throat. The head was laced to the gaff just as the
lugsails of the first rig were laced to their yards, using a series of marline
hitches. Photos of these will be on the next post.
The next thing was the gaff.
An eyebolt was put through the throat for clipping the throat halyard
on. A metal strap bent into a U-shape
and attached to the underside of the eyebolt was used to secure the mainsail’s throat. The head was laced to the gaff just as the
lugsails of the first rig were laced to their yards, using a series of marline
hitches. Photos of these will be on the next post. Next came the boom. The
foot of the sail is secured to the boom at the tack with a pin. A
gooseneck screwed to the mast enters the fore end of the boom. The epoxy-reinforced glooseneck hole in the
boom has a mouth with square cross-section to ensure a tight fit and no
twisting. Both are seen in the first photo.
Next came the boom. The
foot of the sail is secured to the boom at the tack with a pin. A
gooseneck screwed to the mast enters the fore end of the boom. The epoxy-reinforced glooseneck hole in the
boom has a mouth with square cross-section to ensure a tight fit and no
twisting. Both are seen in the first photo. 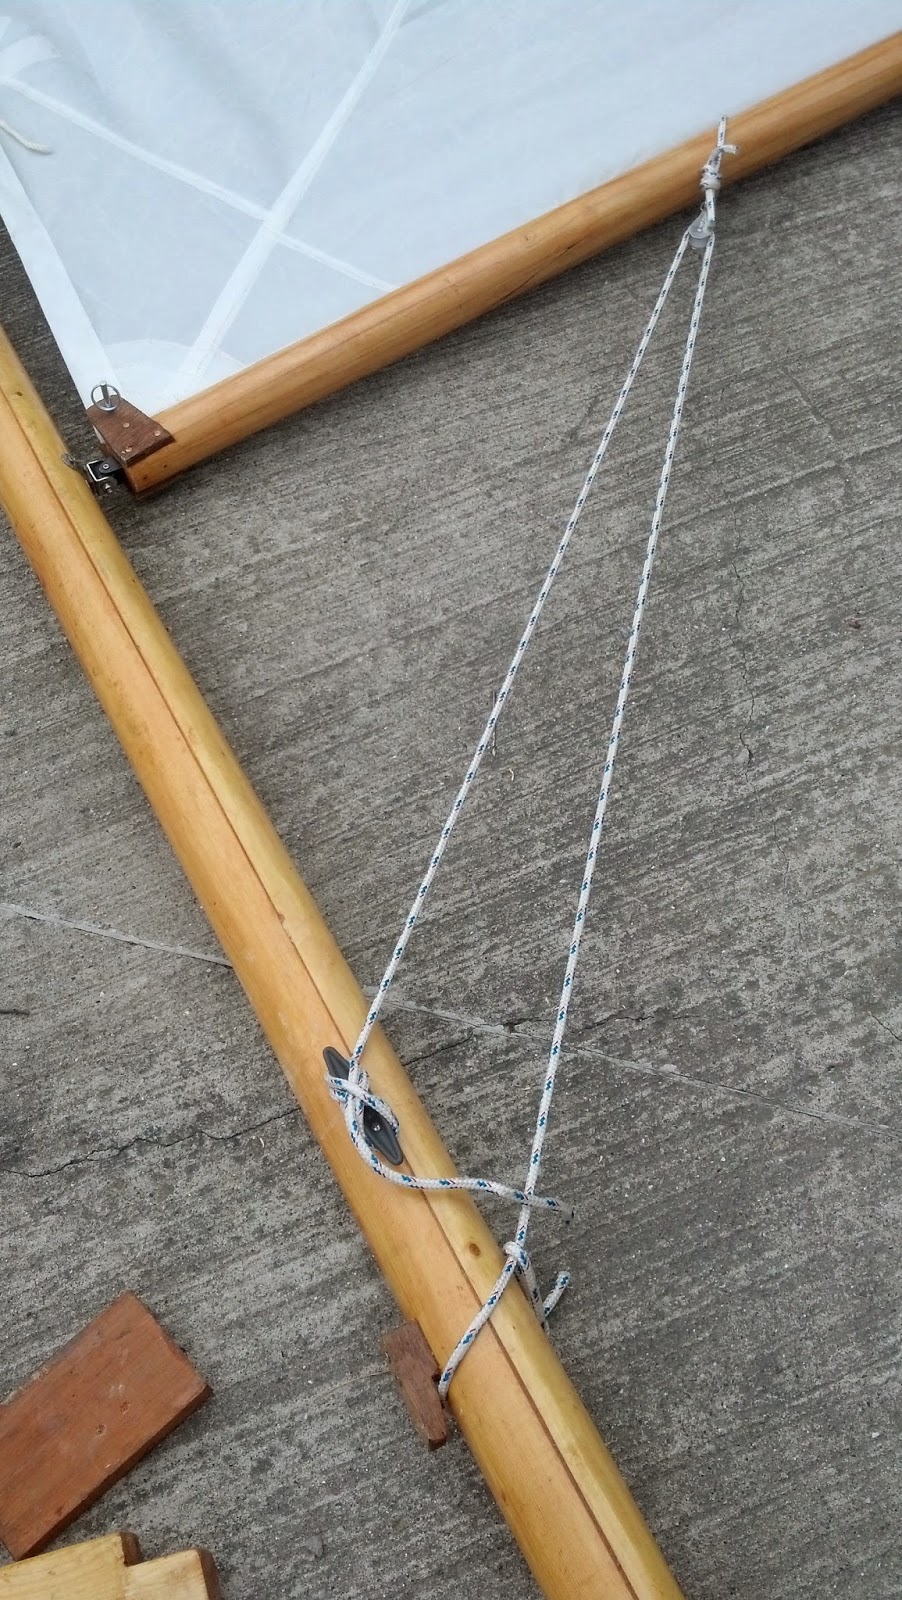 The third photo shows the boom vang. It starts with a running bowline secured to a wooden cleat, runs through a block tied to the boom, and ties off on a horn cleat. The boom vang will keep the boom on its goose neck, and stop the boom from lifting when sailing downwind, something that gaff sails are prone to.