Sunday, November 17, 2013

More gaff and mast work

Carpentry on the new rig is progressing well.  The gaff jaws (first photo) were put together from two oak boards and four layers of 3/8 inch (9 mm) plywood with epoxy and stainless steel deck screws.  The holes for the parrel line will be drilled later, after fitting the gaff to the mast.

Then I worked on the mast step and partner.  I drilled two horizontal 1/4 inch (6 mm) bolt holes through the partner and bulkhead, and two vertical holes for the bolts that will keep in place the oak board securing the mast in the partner (second photo).  While I was drilling the port side bolt hole the wood cracked.  To deal with the crack and to avoid any more problems I removed 1/4 inch thick pieces from the bottom of the partner and glued plywood there: you can see the plywood layer if you look carefully.


I then put the mast step down on the keel batten with bronze nails, epoxy and stainless steel screws, and secured the partner to the main bulkhead with epoxy and two long lag bolts, with washers and nuts on the other side of the bulkhead.  Then came the time to try out the mast in its place.  As it turns out I had not accounted for the rake of the mast ahead of time (it was hard to do anyway), so the mast could not go all the way in and the oak board going across could not close.  I worked on the partner with the wood rasp, testing the fit several times.  Like all hand work it took a while, but now the mast fits in its partner and step.  Stepping it several times proved to me that it is easily doable by one person.

The last photo shows the new mast and bowsprit.  They still need some hardware and finishing, but I was pleasantly surprised at how straight a mast made from a couple of 2x4s turned out to be.  It is a little awkward and definitely heavier than the previous ones (as it needs to be) but at least it does not need to be vertically dropped through a partner hole, something that would probably hurt my back at my age.  I can shoulder it and walk it into place pretty easily.

I have already cut and shaped the wooden pad eyes for shrouds, and will be working on sails and standing rigging soon.

Until the next post,
boatbuilder

Saturday, November 2, 2013

Mast, step, partner, gaff


I bought SPF (spruce/pine/fir) 16-foot studs for their easy availability and low weight, which is a higher priority than high strength and stiffness, since the mast is stayed.  Low cost is a nice extra.  I chose two that were as straight and knot-free as possible.  Taking them home was a bit of an adventure, involving foam rubber, duct tape, cinch straps, staples and a red rag, but all went well.  Next I glued them together with epoxy.

Next in line was cutting and laminating the bowsprit as described in the previous post (first photo).  I test-fitted the slot over the bow extension.  Then I cut and laminated the bowsprit brace out of a piece of 2x4 and ¼-inch plywood.  There is a 1½ x 2¼ inch rectangular hole on its bottom center, and the bottom is curved to fit the foredeck.  A 1¾ x ¾ inch piece was removed from the rear top of the bowsprit to fit the hole.
 
I also cut and laminated the parts of the mast partner, which may be sturdier than it needs to be but I wanted plenty of strength for bolting to the bulkhead.  The mast step was laminated from a layer of cedar board and two of 3/8 inch plywood (second photo).

Then I set up the table saw outdoors (I needed 34 feet of space for the job, plus who wants to clean sawdust indoors), with my sturdy sawhorses doctored to have supports level with the table saw.  With a friend’s help I trimmed two sides to achieve a 3-inch-square cross-section, then cut off the four corners into an octagon.  All standard procedure I have used before.

The following weekend I hand-planed, tapered and sanded the mast into a smooth cylinder.  As before, I was not intent on perfect roundness or smoothness: this is a home-made mast and a slight hand-hewn look is fine by me.  Here is the new mast along with the old cracked one (third photo).  Exaggerated perspective notwithstanding, you can see how much sturdier the new one is.

The next step was to saw away a 3/8 inch layer from each side of the tip of the gaff (former mainmast) and cut oak pieces that will be glued there to make the jaws just over 3 inches apart.  The four layers of the jaws proper were cut out of 3/8 inch plywood.  The gaff tip was then rounded so it can pivot around the mast with ease.  The various parts are shown in the last photo.


Next steps, hopefully to be completed before the real cold sets in, will be:

  1. Laminate the jaw layers in pairs and screw and glue the entire jaw assembly to the gaff.  The holes for the parrel line will be drilled after careful fitting.
  2. Try out the mast in its step and partner.
  3. Bolt and glue step, partner and bowsprit brace.
  4. Glue and screw oak pad eyes near the mast top.
  5. Finish all with epoxy and varnish.

Then it will be time for the standing rigging, making the sails and fitting the running rigging hardware and lines, if all goes well in plenty of time before the spring.

Thursday, October 31, 2013

The new rig


The last thrilling experience sailing Aerie on Lake Erie ended with a cracked mast: the mainmast bent so much in strong winds that it delaminated at a scarf joint four feet above the mast step.  I was faced with a choice among several not too satisfactory options, all discussed with the good folks at the Wooden Boat Forum.  The masts were too slender for unstayed operation in strong wind.  I could repair the mast and reinforce it with fiberglass tape at the joints, but that would create stiffer parts that could lead to breaks elsewhere.  I could use a fiberglass sleeve (too expensive and would lead to cracks down the line).  I could use a forestay and shrouds, which would interfere with the turning of the yard and negate the simplicity of the unstayed cat ketch rig.  I could build a thicker, stronger mast, which would be hard to drop into its partner hole in the foredeck.  I could replace the masts with aluminum tubes, which would be expensive and require new tools and skills such as pop-riveting.  Or re-rig the boat completely.

I had already had many problems and confusions with rigging the two masts: two each of halyards, snotters, downhauls and sheets that had to be lying on the correct side and not fouling each other.  So I thought, if I have to build a new mast, why not be bold?  In the end I decided to switch to a gaff sloop rig, which will take a good amount of time to set up before launch, but will be sturdy and less prone to confusion and mishap during launch and sailing.

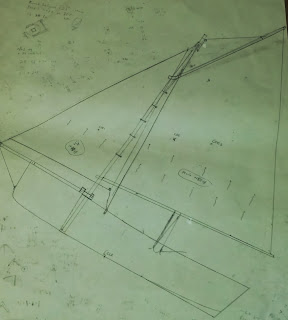
I went back to pencil and paper and designed the new rig to be balanced, with only the slightest bit of weather helm.  Here’s the sketch, a bit messy but fine for my purposes.  Mainsail is about 80 square feet (7.2 square meters) and jib about half the size.

16 foot studs being a readily available size of lumber, I settled on a 16-foot-long, 3-inch thick mast made from two studs glued together.  The bottom tapers to 2¼ inches to fit into a mast step secured to the keel batten.  The top has only a very slight taper since the hounds are quite high up.  Forestay and shrouds will be 1/8-inch synthetic rope (amsteel blue, which is stronger than steel and does not require expensive tools such as cutter and crimper) with eye splices at both ends: the top ones loop around the mast through oak pad eyes, the bottoms around steel thimbles, attached to steel turnbuckles.  The turnbuckles attach to steel straps bolted to the hull or bowsprit (everything is stainless of course).

The mast partner has a jaw-shaped slot for the mast, and will be secured with bolts and glue to the main bulkhead.  It is laminated from three layers of 1x8 pine and one of 3/8-inch plywood.  The mast will be secured with an oak piece bolted through the partner.

A gaff sloop needs a jib, so I designed a 78-inch-long, 2¼ inch thick bowsprit laminated from three layers of 1x3 lumber.  It has a slot that fits over the bow extension which I had built in for just this eventuality.  It will be secured to the bow extension with a pin.  Its aft end fits into a brace bolted to the aft end of the foredeck.  The forestay will be attached to its forward tip, which is secured to the lower bow with more line.
The mainsail is a classic gaff trapezoid, attached to an 8-foot gaff and an 11-foot boom.  It will have two sets of reef lines.  Since my original main mast came apart right near the 8-foot mark (second photo), I decided to cut it to 8 feet and repurpose it as a gaff, with jaws made of oak and plywood and a parrel line with plastic beads.  


The mizzen mast, shortened only slightly, will serve as the boom.  I will be reusing a leftover gooseneck I experimented with on my original boat.  The boom will have a sheave at the clew end for a clew outhaul, and will be controlled by a mainsheet with a 4:1 purchase just aft of its middle.
The jib is a simple triangle and will be clipped onto the forestay.  The running rigging will consist of three halyards (throat and peak for the gaff, and jib) and two sheets (main and jib), plus a topping lift to assist with rigging and reefing.  A total of seven blocks (three for halyards and four for mainsheet), eight snap hooks and assorted cleats will be needed.  Most hardware will be repurposed from the original rig; I only had to buy one block with a becket and two open clam cleats.  I decided that it is important to have different-colored lines so inexperienced crew can be given simple directions.

I have already bought most materials and hardware except for some sailmaking supplies and line for the running rigging.  My new suppliers (and they are good and responsive) are LFS Marine & Outdoor (good purveyors of amsteel rope and related hardware) and Duckworks Boat Buiilders Supply (who stock parrel beads for gaff jaws, of all things, sailmaking supplies and good, inexpensive chandlery).  The budget is about $350, or more if I run out of epoxy.

Next I’ll be talking about adventures in boat carpentry, so keep rading 176inches.

boatbuilder

Saturday, August 31, 2013

More adventures


Back in June we had a nice sail around Maumee Bay, and coming back we had to beat into the wind.  Unfortunately the knots in the loop of line securing the sheet block to the main sprit boom came undone and we were left with an out-of-control mainsail, just as the wind was becoming brisk if not fierce.  Not to be deterred, I left my friend Michael at the helm and grabbed the end of the boom with my hand.  Every time he tacked (and it was several times) I changed hands and sides and held on for dear life as the boat bucked the waves.  The virtues of two masts with smallish sails and the gentle behavior of the rig were apparent.  We made it to the ramp with no trouble.  Until, that is, I tried to bring the trailer around for retrieval.  I looked left and right, started moving out of the parking spot, looked behind to check the trailer, and then bang!  I had a low-speed collision with an SUV that was not supposed to be there.  He had snuck around from the wrong side of the parking lot behind two parked trucks, zoomed along and ended in the wrong place at the wrong time.  Anyway, a waste of time and money and a nuisance but no harm done.

Going out was fine, like the last time.  With a fair wind it took us no time to sail out to Maumee Bay State Park, where we beached the boat and had a quick swim.  I say quick, because the algae bloom was pretty bad so it was neither pleasant to look at nor particularly safe.  On the way back the same thing happened: we had to beat into an ever-stiffening wind and whitecaps.  As the wind got very strong, I was keeping a wary eye on the mainmast that was bending quite a lot.  I said to Michael, “you know, it would be really bad if the mainmast failed.”  As soon as I said it he pointed out that the mast was starting to delaminate at one point above the foredeck.  I did not bother to check it myself: I gave the helm back to him and dropped the mainsail, hoping to get in just by the mizzen, or by rowing if that didn’t work out.

Now I know what happens to a cat ketch with no mainsail.  It would not tack so we had to wear (turn through a gibe).  A sprit boom is much gentler than a regular one in a gibe, but still.  One time the boom tip knocked Michael’s hat off his head and he steered us back so I could retrieve it with the boathook:  a flawless maneuver that gives me some confidence that we can deal with a man overboard situation.  But every time we wore and gibed we lost whatever way we had made and were not moving.  So I decided to drop the mizzen sail, unstep the mizzen mast and row in.  In my haste I let the yard down too quickly and it hit me on the forehead, causing a scratch that bled quite a bit (for a short time fortunately).  We then rowed in the teeth of the waves and wind for over an hour.  It was incredibly hard work we but made it back for a well-deserved picnic.

So now what?  In designing the masts, I had not taken into account the fact that a lugsail is attached to the mast in only one place, at the very top where the yard is secured with halyard and toggle.  Hence the very noticeable bend.  The bending stress clearly found the weakest spot, a scarf joint on an outer layer of the three laminated together.  Interestingly there is much less bend and no problems so far with the mizzen mast.

I first considered two options: making new aluminum masts, or wrapping the existing masts in two layers of fiberglass tape.  Both are costly and would require a lot of work.  Fiberglass would also increase the weight, and for aluminum masts I would need to learn new skills and get new equipment (a pop riveter, say, as well as new hardware).  I therefore settled on a partial approach: only reinforce the places where there are outer scarf joints (two per mast) with fiberglass tape.  Bending per se is not a problem: it actually helps by flattening the sail and spilling wind in when it blows hard.  So I will try again and play it by ear.  If this is not enough then there are plenty of other options.  Aluminum masts won’t look as nice but are stronger per pound of weight.  And much as I hate to give up my one-of-a-kind rig and beautiful hand-made spars and sails, the boat can always be re-rigged.  A gaff sloop would be a good candidate.

Another thing I decided after all these adventures is that having an auxiliary engine is a good idea.  I will therefore accept a colleague’s offer of a very old, light and low-horsepower outboard.
But I hear you say, what about the leak, is it vanquished?  Alas, not quite.  Every time I tinker it gets smaller (down to about 1.5 liters/quarts after more than five hours) but hasn’t gone away yet.  I think there is a tiny void at the aft end of the centerboard slot.  I hope this is the end of it.

Until the next report.
boatbuilder

Tuesday, May 21, 2013

A year later

It's been a year since I launched Aerie for the first time.  She's only been in the water three times, two of which were proper sails (the third was a test for leaks in the city reservoir).  Between travel, a daughter's wedding and efforts to fix the leak there just wasn't much opportunity, and the sailing season is short here in the Great Lakes region.  This year in particular we had a long cold winter and a miserable spring, and in Mid-May we had lows pretty close to freezing.  But the boat is ready to be launched again.

Since my last efforts to fix the leak, and having learned from the first two shakedown cruises, I made a few small improvements.  First of all I made a final effort on the leak front.  While bantering in the gym locker room with someone who is an old hand at boating, I found out about Boatlife LifeCalk, a polysulfide caulk that is apparently the best for under-the-waterline sealing.  It's very messy to work with, but that is its strength: it sticks to anything with great tenacity, can cure underwater, and is strong but flexible.  So once again I removed the plank covering the ballast compartment, removed one package of lead shot (in two layers of ziplock bags), and removed the pivot bolt and CB.  Then I put a bead of LifeCalk along the centerboard (CB) slot, where the CB trunk meets the boat's bottom.  Two days later I packed the CB pivot bolt hole with the same at both ends while putting the pivot bolt and CB back.  Then I replaced the outer ziplock bag (which had been torn during the removal of the ballast), repacked the ballast and replaced the plank.  I didn't want to hex it, but I was hoping the leak was history.

I also modified the way halyards connect to the yards.  Having to rove the halyard through its mast-top block (before the mast is stepped and with the yard and sail attached) adds to the complications and can be awkward and error-prone.  So I undid the beautifully simple double constrictor hitches by which the halyards were attached and installed steel pad eyes to each yard, with plywood reinforcements and epoxy in the screw threads.  Now each halyard will stay permanently in place on its mast, and a snaphook (tied to its end with an achor bend) will be clipped to the yard when needed.  Hopefully the pad eye arrangement is strong enough. 

In addition I put reefing ties through the reef points in both sails, something I had neglected to do, and filled and varnished some dents and scratches on the seats, which were made by the bolts on the rudder while I was carrying it inside the boat.  The rudder now travels in the car.  Finally I replaced the rubber handle on the boathook, which somehow came off and was lost in the drink last year without anyone noticing. 

The first launch of the season was simply to test for leaks.  I dropped the boat in the city reservoir and rowed it around for an hour and a half.  I will have to wait until  I return from my trip to the UK and Ireland to do some sailing.  After reseating the pivot bolt and sealing a couple of pinholes in scarf joints, the leaking problem has been fixed!

Then I weighed the boat, something I had never done.  What I did in fact was weigh both the boat and trailer at the local quarry.  Assuming that the trailer is 180 lbs (82 kgs) per the manufacturer's statement, Aerie is 480 lbs (218 kgs) for the bare hull (with CB but without rudder, rigging or other equipment).  Have to say, I thought it was a fair bit less.  But I guess just the plywood was about 260 lbs (120 kg).  Add all the floor slats, dimension lumber, gallons of epoxy, paint, etc. and 50 lbs of ballast, and it makes sense.  Or the quarry scale is not accurate (that's what I say when I don't like my own weight reading).

Until the next time,

boatbuilder