Tuesday, December 20, 2011

Control surfaces


In the past four weeks I worked on the plans for spars and sails, but I also took advantage of the few and rare mild and dry days to work on building and finishing the control surfaces (rudder, tiller and centerboard—CB).  I call them control surfaces, even though I don't know if anyone else does, because of the aviation analogy: that's what rudder, ailerons, elevons, etc. are called in planes, and I used to build model planes years ago (as if more evidence of being a nerd and an "anorak" were needed).

Anyway, I designed and cut the tiller, which is made of cedar sandwiched between two layers of 6mm (1/4 inch) plywood.  The plywood extends beyond the cedar core to create the jaws that will enclose the top of the rudder, and the jaws themselves are reinforced with a layer of 9mm (3/8 inch) plywood on each side.  You can see the nice, curved shape that I cut: it brings the tip of the tiller down from the high transom top to a comfortable hand position, but high enough to clear the boat’s sides if necessary.  I will find out if I need a tiller extension after the launch.  And BTW, if you look carefully at the rudder you'll see a couple of holes drilled in error (pathetic, I know, but easily fixed with filleting compound).

 I also glued together the two layers that make up the rudder top and bottom and the centerboard.  Finally I did a lot of sanding on all the pieces, including putting rounded leading edges and tapered trailing edges on the CB (last photo) and rudder bottom, to reduce the drag they create as they flow through the water.

Then, as planned, I moved most of the tools and materials into the basement—the garage has got too cold for epoxy to cure, not to mention uncomfortable for the person doing the work.  The basement has no real ventilation in the winter (too cold to open the windows) and it lies under the dining room and kitchen of the house, so I have to be careful about fumes and dust.  I duct-taped a furnace filter to a box fan, which takes care of most of the dust, and I do whatever epoxy work I need in small batches with a respirator on and the fan at full blast.  So far things have worked out OK, and I will leave the coating of the spar surfaces until the spring.  Anyway, I am pleased to say that I am basically done with the rudder, tiller and centerboard.  They have been sanded and given two coats of epoxy; the rudder jaws were nailed and glued on, and the pivoting and fixed parts of the rudder drilled and bolted together.  The fit is pretty tight and some extra sanding was necessary: I will need to use some waterproof lubricant to make the pivoting smoother.  The tiller will be connected to the rudder top with a bolt (a clevis pin is standing in for now) that allows the tiller to pivot up when needed, and pintles and gudgeons were bolted and screwed in place.  

So the rudder is almost ready to use.  In the spring I will give it a couple of coats of spar varnish as well.  At that time I will attach the centerboard to its case with another bolt so it can pivot into the water—this will need to happen before I fill the ballast box with lead and lay down the floorboards.  Both rudder and CB will need bungee cords to keep them in the down position and cleated lines to pull them up.

Next I will be laminating and shaping the yards, working on the sails and starting on the masts.  All this will probably be after the holidays, and I’ll have about three months to do it before the weather allows me to go back to the garage to finish the boat.  With a lot of luck the boat will be launched on the first sunny, warm day of the season!

So merry Christmas, happy holidays and a great new year to all.  Check 176inches after the new year!
boatbuilder

Tuesday, November 29, 2011

Acknowledgements

Now that virtually everything, including rigging details, has crystallized (if not writ in stone--that won't happen even after the boat's launch), it's time for some acknowledgements.  In designing and building my boat, I drew inspiration from a very wide range of sources, some of which were anonymous, some which I have forgotten.  The amateur boatbuilding community is very generous with ideas and advice, and inspiration and emulation is widespread and natural—after all, it’s been said that imitation is the sincerest form of flattery.  I did not copy anything specific in detail, I just used well-known practices (and quite a few improvisations) to achieve what I wanted, based on the many inspirations.  All calculations and decisions, all errors and corrections, and even some small innovations are mine.
Even so, I would like to gratefully acknowledge the following people/businesses for inspirations and influences by subject (a specific boat design is listed as appropriate). 

  • General lapstrake hull design: John Welsford, François Vivier, B&B Yacht Designs (Lapwing)
  • Broad lapstrake hull design: Iain Oughtred (Caledonia Yawl)
  • Cat ketch basics: B&B Yacht Design
  • All manner of stuff on traditional sails, helm balancing, marlinspike skills, etc.: David Nichols
  • Sprit booms: B&B Yacht Designs, David Nichols
  • Lug sails: David Nichols, Jim Michalak
  • Standing lug/sprit boom combo: John Welsford (Houdini)
  • Sheet arrangements: B&B Yacht Designs
  • Halyard arrangements: François Vivier, Michael Storer (Goat Island Skiff), David Nichols, Jim Michalak
  • Broadseaming: Todd Bradshaw
You probably already know that I did not buy any plans for this boatbuilding effort.  That was obviously not for reasons of economy (even though some people think I am cheap): buying plans would have saved me countless hours of planning, calculating and improvising.  As I explained in my two earliest posts, I did not find a design that fit all my needs, and I greatly enjoyed the whole challenge of designing from scratch and building on the fly by the seat of my pants.  For people who are less crazy than me, I would heartily recommend the plans and/or books of the fine naval architects listed above.

Thursday, November 24, 2011

Sail Plan


When I started this blog I said that my plan was for a cat ketch, with a balanced lug fore (main) sail, and a standing lug sail with a sprit boom at the mizzen (aft) mast.

Upon reflection, I decided that it would be simpler and better to have the same type of sail both fore and aft.  I like several things about sprit booms, and B&B Yacht Designs expresses them eloquently.  One of the best is that, when the boom goes about, at worst you get slapped by a bit of canvas, instead of a length of wood or metal which can knock you senseless and/or overboard.  

The second reason was a balanced helm.  The placement of the mizzen mast partner (at the rowing thwart, just forward of frame 5) and the centerboard (between frames 3 and 5) was largely dictated by the boat’s basic design (the placement of the boat’s frames), so I had to design the sail plan around them.  I did, but at first I neglected to take into account the effect of the skeg and rudder on the Center of Lateral Resistance (CLR).  Adding these to the calculations moves the CLR aft, which means that the original sail plan would have resulted in a serious lee helm.  A lee helm can be dangerous: the moment you let go of the tiller, the boat turns away from the wind and it’s off to the races.  It’s best to have a slight weather helm, where the boat will naturally turn into the wind in an emergency and stop dead in its tracks.  I therefore had to move the Center of Effort (COE) aft too.  

To accomplish this, first I moved the mainmast position aft to just forward of the foremost bulkhead, about 22 inches from the bow.  This led to a reduction in the mainsail size, which also moves the COE aft.  Then I changed the sail type to the standing lug/sprit boom combination, which added to the effect, since the tack of this sail is further aft than a balanced lug’s.  Finally, I opted for a smaller main mast/sail and a larger mizzen mast/sail.

Taking all that into account, the sail plan now looks as you see it below.  It took me a while to make good on my promise for a full hand-drawn sketch, but better to be late and accurate than early and wrong.  The centerboard did not fit on a regular sheet of paper at an inch-to-millimeter scale, so it's truncated.  COE marks the combined center of effort.


The mainsail has an 84-inch (2134 mm) foot and a 96-inch (2438 mm) yard.  The sail area is 58.5 square feet (5.44 m2).  The mast will be 142 inches (3607 mm) long and 2 ¼ inches (57 mm) in diameter at the partners (click on "spars" label on right to learn more).  That’s a short mast, which has many virtues: it fits easily inside the boat (with the fore locker sliding door open), it’s short enough to be unstayed (no standing rigging!), it has a lower COE and center of gravity (which makes the boat more stable), it’s cheap to make and simple to work with. The clew of the sail will have about 6 inches (152 mm) of clearance forward of the mizzen mast, and 36 inches (914 mm) of clearance from the seats, leaving plenty of room to avoid the swinging boom-end with no ducking for most people.

The mizzen sail’s dimensions are proportional to the mainsails, and about 93% the size.  Thus we have a foot of 78 inches, an 89-inch yard, and an area of 49.5 square feet (4.6 m2).  The boom-end at the clew will be a little aft of the transom.  Clearance from the seats is the same as with the mainsail.  Mast length is 139 inches (3531 mm), and diameter the same as the main’s.  Given the dimensions of the two masts, it is possible to make both with a total of nine 8-foot boards.  That assumes no errors: hope springs eternal. 

You may wonder why the two masts do not conform to the 93% ratio.  First of all, the mainmast step is a full 5 inches further above the baseline than the mizzen one, so the total length can be correspondingly less.  Secondly, what matters for the proportions is not total mast length, but the length between the tack and the yard, which is only 97 inches in the mainmast, and consequently 90 inches in the mizzen. 

Under the final sail plan, the COE is well aft of the middle of the lowered centerboard, which should make for a balanced helm (fingers crossed).  The total sail area will be 108 sf (10 m2), which should make the boat reasonably zippy.  

Balanced helm, zippiness and how close and how well the boat will sail upwind all remain to be seen, and I may need to make more adjustments after the boat’s launch.  I am hoping for 90-degree tacks but will settle for 100.  Heck, I won’t be racing against any tall-aluminum-masted affairs with complicated standing rigging, genoas, fancy boom-vangs, jibsheet capstans and the rest.  My whole boat design and building effort is based on a principled rebellion against high-tech complexity, uniformity and the racing rules that spawned them.  In any case, if other traditional sail aficionados are to be believed, my Aerie should be able to leave behind any comparable Bermuda-rigged boat on a beam or broad reach, where lug sails excel.

By now almost all of the hull work is done.  As you can see, though, there’s plenty more, so keep reading 176inches!

boatbuilder

Sunday, November 13, 2011

Rubrails

Today I did what I promised myself would be the last thing in the garage for the season:  I put on the oak rubrails.  They are 3/4 inch by 2 inch oak, and it was hard to bend them around the curves of the sheer, along both the y (around the decks) and z (up and down) axis.  I had to cut kerfs on the inside in the forward part, drill recessed pilot holes, and get help from my wife.  Still, I had to stop in the middle and go buy a couple of large, strong clamps to hold things in place amidships.  Also managed to strip a couple of screws, which is par for the course.  There are places where there are tiny gaps between the rubrail and the sheer, but nothing which that last refuge of the desperate boatbuilder, filleting compound, will not fix.  I still have to do that and fill the screw holes, but the table saw, shop vac and tools and materials will be moving into the basement so I can work on the spars and other things (see the previous post). 

So, as usual, keep checking 176inches.

boatbuilder
Wednesday, November 9, 2011

Decks, splashguards and spar planning

With winter approaching, I have been winding down the work on the boat (as opposed to spars, oars, centerboard and rudder, which I will make in the basement, and sails, which I will sew in the house), and on Sunday I cleaned up the garage for the season.  I was amazed how many small or narrow, useless scraps of plywood I had left over, but that's what you get with all the curved and irregular pieces.

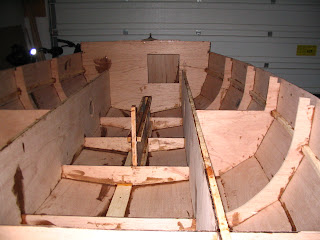
Meanwhile, the weather in Ohio is holding, and yesterday we had almost 70 degrees (over 20 Celsius).  Not for much longer, that's for sure.  But since it's reasonably mild still, I first put on the side decks and sanded their edges and those of the foredeck smooth.  Then I marked and cut the splash guards.  The forward one is nailed and glued on the main bulkhead, protrudes 1.5 inch over the foredeck, and fits around the upper rail of the forward sliding door.  The side splash guards start forward at 1.5 inches over the side decks and end at about 3/4 inch at the transom.  I glued and nailed them onto the side deck vertical boards.  If you look closely at the picture, the splash guards are a little irregular and will require a little planing/sanding to smooth the curves.  This comes from cutting them free-hand with a circular saw.  I could have invested in a scroll saw but did not see the need beyond this one-off job.  I intend to put on the oak rubrails at the sheer this week.

If my luck with the weather holds I might do some finishing on the decks.  Finishing benches and inside bottom will probably wait for the spring, when I complete the flooring.  I am looking forward to taking a bit of a break from this frantic race with time and climate.  The auxiliary (winter) work will start soon enough.  Speaking of that, some words about what is planned:

Last weekend I bought the lumber for masts, yards and oars.  Good, clear, knot-free lumber is surprisingly expensive, but using stock white pine studs like I did in the past is a real pain, with all the knots and voids, and not very strong.  I designed the masts based on calculations from free software (Mast by Robert Tyrrell).  They will be laminated from three layers of 1X3 clear pine (3/4 by 2.5 inch in actual measurements).  The mainmast will be about 12 ft (3.66 metres) and the mizzen 11 ft 7 in (3.53 metres).  Both will easily fit inside the boat.  The diameter will be 2 1/4 inches (57 mm) at the partners, with some tapering above and below.  With all the scarfing, lamination, trimming, tapering, cutting the corners into octagonal cross-section, final rounding and finishing, the masts will be a lot of work.  Yards, by contrast, will be easy: two layers of 1x2 inch pine (3/4 by 1.5 inch in actual measurements) glued together, and some rounding of the corners.  As for the sprit booms, I already have one from a previous rig, and the second will be the same: a piece of closet rod with an epoxy and varnish finish.  Then of course I will have to get all the beautiful and perplexing chandlery of rigging: blocks, cleats, line, etc. for halyards, snotters, sheets and more.  I am a thrifty guy, and the boat will have traditional, unstayed, sturdy, simple rigging, so high-strength, high-performance, expensive stuff will not be necessary.  I have taught myself splicing, servicing and other marlinspike skills which will come in handy.  There will be plenty of posts about all that, of course.

The oar shafts will be made of two layers of 1X2 poplar stock, and the blades will be clear pine edge-glued to the shaft and its extension in the middle.  There will be quite a bit of rounding and tapering, planing and sanding.  I will also leather the place where the oars meet the bronze oarlocks, and add what is called a button to each oar so it doesn't slide out.  I will talk about the sails another time.

So keep an eye out for more adventures on 176inches.

boatbuilder
Sunday, October 30, 2011

Foredeck

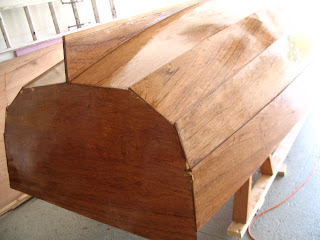
The last week was busy.  I screwed and glued the inner side-deck boards onto the side-deck knees (first photo).  Then I gave the insides of the fore-end (which were to be covered by the foredeck) a second coat of epoxy.  I also put the hinges on the flip-up doors.  This involved gluing scraps of plywood on the underside of the doors where the screws were coming through, and chiseling 1/4 inch off the door frame underneath.  Once all was fitted, I removed the screws while I still had clear access to them; I will put everything back together once the benches and doors are all finished.

Then I marked and cut both fore- and side-decks.  This is harder than it sounds.  The foredeck is curved and nothing about it is straight.  I had to screw the plywood along the centerline and bend it to shape before marking the cut line from below.  Ditto the side decks: they curve in strange ways, plus since the side-decks are over 11 feet I had to mark and cut two pieces per side (which will be butt-joined with a scrap of plywood on the underside).  I finally gave the undersides of all decking and all surfaces that they will be glued to a coat of epoxy.

Today I gave the undersides of the decking a second coat of epoxy.  Then I marked where several boards will be attached to the main bulkhead.  One will support the floorboards, and two will be the rails for the sliding door of the fore locker.  Just before putting down the deck I attached all three (the bottom rail with screws only, so I can put in the door once all is properly varnished).  You can see them in the third photo.  Then I slathered epoxy filleting compound on all appropriate surfaces for putting on the foredeck: centerline beam, extra beams, inwales, and bulkhead doublers.  I finally proceeded to screw and nail the foredeck down.

What I should have foreseen is that after two coats of epoxy even 1/4 inch (6 mm) plywood becomes very stiff, so it took extra muscle, screws and nails to keep everything down.  A curved foredeck (photos two and three) is a thing of beauty, but it's a lot of extra work.  So much so that I gave up on doing the same with the side decks today.  I am still racing against time before serious cold descends upon Ohio, and I owe it to my wife to clean the garage up and clear space to store things like the grill for the winter. Just a few more days, though, and everything but topside finishing and floorboards will be done.

Although come to think of it, there is also the little matter of the oak rubrails.  Will I have to build a steam box to steam-bend them?  Or will I just cut a few kerfs on the inside and hide them with filleting compound?  I think I'll opt for the latter...  

So keep checking 176inches!

boatbuilder

Sunday, October 23, 2011

More inside work


In the past two weeks I have been working away, trying to do as much as possible before serious cold sets in.  I cut, fit and glued side deck knees, seen on the left, which are awaiting 1x2 boards (already scarf-joined to just over 11 feet) to be screwed on their narrow faces.  The knees, inwales and boards will provide the base for 6-inch-wide side decks.

Then I made sure I do whatever needs to be done before the foredeck goes on.  It included extra beams between the two fore bulkheads, and reinforcements for the mast hole and for the halyard and snotter cleats (I'll explain later).  These are in the second photo, which shows the fore-end.

I also needed to put on a mast step for the fore (main) mast.  I had to calculate its placement from the rake angle of the mast (trigonometry again).  I glued two pieces of lumber on each side of the keel, and then laminated two square pieces of plywood and cut a two-inch round hole in them.  I finally screwed and glued all together (third photo).  I did the same for the mizzen mast, just next to the aft end of the centerboard case.

Then I laminated two oblong pieces of plywood (3/8 and 1/4 inch thick, or 9 and 6 mm) to make a rowing thwart, which will also be the mizzen mast partner.  I cut a 2 1/4 inch hole in the thwart and attached it to the benches in the right position (again I had to place the mast partner and mast step holes so the rake of the mast is correct).  The thwart is also supported by an oak board that protrudes from the centerboard case.  That's in the final picture.
 
I also glued together two pieces of oak molding of different widths to make rails for the sliding door of the fore locker.  These will have to be put on before the foredeck goes on, but the bottom one will be finally glued in place after all the surfaces are finished. 

Finally, I cut all the pieces of centerboard and rudder.  They are ready to laminate and finish (sometime in the winter).

That's a lot of work, and good work if I may say so myself.  Why does it feel like I'm not making progress?  I suppose because of unrealistic expectations.

For more progress, keep checking 176inches.

boatbuilder


Saturday, October 8, 2011

Back from Europe

I was away for two weeks (and three weekends) on vacation in England and Ireland, visiting friends.  We spent most of the time in London, with a four-day trip to Ireland where our friends are building a house out of the ruins of a family cottage and cow-shed, on a lonely windswept hillside with stunning views, and overight trips to Cambridge and Brighton.  We visited my alma mater (Sussex University), met some of my college friends from 32 years ago, hiked on the Sussex downs, walked long distances, went on a punting trip on the river Cam, attended services at King's College, Cambridge chapel (with the men's and boys' choir filling the Gothic space with angelic music), visited museums, saw four plays, ate wonderful food and sampled excellent beer.  It can be argued that all that is not the subject of this blog, but it is relevant because it delayed the boatbuilding, and in any case it falls under the category of "other follies."  Our second week there coincided with a record heat wave (for England), up to the mid-80s (or almost 30 Celsius).  That was nice except that it was totally unexpected (people had been grumbling that the UK hadn't had a summer at all this year) and we hadn't packed enough warm weather clothes.  On a Saturday in and around Brighton, on the south coast, the beaches were mobbed and the sea was full of beautiful sailboats.

Which brings us to the main subject of the blog.  Since coming back I reinforced the undersides of the bench tops with extra strips of plywood, covered the insides of the benches with a second coat of epoxy, and waterproofed (hopefully) the buoyancy compartments with epoxy fillets along the seams.  Then I glued and nailed the bench tops in place.  They still need to be finished, and the doors reinforced, fitted and finished.  Finally, I glued and screwed the inwales in place.  Nothing worth taking a picture of yet, but things are steadily moving along.  The next big step will be side deck knees and the side- and fore-decking.  Somehow I doubt I will finish before the cold weather sets in.

So, despite the occasional slow stretch, keep reading 176inches!

boatbuilder

Monday, September 12, 2011

Benches and lockers


The past week I continued to work on the inside of the boat: seat tops and locker doors.  On the left you can see all the pieces (10 of them) all fitted quite precisely: four long seat tops, three hinged flip-up locker doors, and three backing pieces (between the doors and the sheer strakes and transom).  In the next photo you can see two of the brass hinges laid on for fitting.  There is still some work to do before putting on the hinges: another coat of epoxy on the insides of the benches, two coats on the undersides of the seats, and reinforcements glued on the undersides of the locker doors.  I just didn't feel like messing with epoxy for a change and concentrated on sawing.

I also cut the sliding door for the fore locker (see photo), which will be between the fore bulkheads.  It will slide on wooden runners set horizontally into the main bulkhead.

Finally, I designed, drew and cut the three distinct pieces of the rudder: the piece attached to the tiller and transom, the pivoting blade that will be in the water, and the jaws that hold them together.  It was very tricky (at least to me, with this being my first effort at boat design) to make sure the moving parts  pivot against each other, and I arrived at it without copying anybody else's specific design.  I will need to cut another identical set to laminate all together.  I will also have to decide whether to use lead or a bungee cord to keep natural buoyancy from flipping up the pivoting blade.  I am inclined to give dealing with molten lead a pass!

As for what comes next, you read it before: more smelly, messy epoxy coatings and gluings.

Until then,  I remain your friend
boatbuilder

Sunday, September 4, 2011

Seats and cabinetry


The last couple of weeks have involved putting the curves on forward bulkheads and transom, and working on the inside of the boat, something that is very picky and borders on cabinetry.  I am building three flip-up doors into the seat tops, which means putting in supports and framing, joints etc.  After cutting all the pieces from aspen (door frames), plywood (reinforcements) and pine (the rest), putting in all the notches, etc., I put one coat of epoxy on the the entire inside of the boat, except the bottom (too hard to reach for now, plus there's no hurry) and the outsides of the seat risers (also hard to reach, and I need to do a careful job since they will be visible and left unpainted, with epoxy and varnish).  In the process I had one more episode of the epoxy overheating and solidifying too early (yesterday was a very hot day).  So now I am keeping the epoxy containers in the fridge, at least part of the time.

I then cut seat tops (see above for forward half), except where the doors will go, and notched them for the frames.  This is harder than it sounds, since the frames are not exactly square.  I also made my first measuring and cutting mistake, which left a gap about 10 mm wide (about 3/8 inch) over part of one seat stringer, on the sheer side.  Not wanting to waste plywood, and given that I don't have much to spare, I will fill it with a thin sliver of ply and epoxy fillet.

Today I glued all the framing pieces (see detail from aft seat/storage area--the crosspiece is not in yet).  Next the inwales will be glued in.  Then the seat tops will be epoxied on the inside, and reinforced where needed.  After a second coat of epoxy on the inside of the seats, the tops will go on, including hinging the doors.  The next step will be braces for the side decks. 

Cheers,

boatbuilder


Wednesday, August 24, 2011

Flippin' pix

As promised, here are the pictures of the boat flipping, in order.  You can admire the glossy finish, or the lightness of the hull, or the beautiful lines (if I may say so myself).  Or not.

Since then I haven't done much on the boat, but I spent a wonderful weekend in Cleveland (yes, you read that right) with my wife and daughters.  It the past few nights I mostly cut the curves into the fore bulkheads, and it's so hard and awkward that I wish I had done it earlier, but you live and learn.  I still have to sand the tops smooth.  I also fit and trimmed the inwales--once again one of them broke, at a knotty spot.  I glued it back together and cut a few shallow kerfs to prevent it happening again.  They are now ready to glue in place.  I hope to make a lot of progress in the next two weeks, while my wife goes to see her mother again (hurricane Irene permitting).

Meanwhile, keep reading 176inches (which, with the bow trim--or false stem as some call it--and curved transom, will be closer to 179 inches in the end).

boatbuilder


Sunday, August 14, 2011

Flippin'

This past week I gave the hull a couple of coats of paint, which made it very shiny and made the small flaws stand out even more, but as I said before I don't care.  Finally, on Sunday afternoon I marshaled together four other guys (thanks, Carl, Chris, Gregg, and Paul!) and we flipped it over (right side up) from the building frame to the trailer.  Before doing that I removed the nails that secured the boat to the frame, and rigged together a safety system of ropes running through eyebolts screwed into the garage walls.  Here I am with the rope system in the "before" picture.  You can see everything being reflected in the super-glossy paint. 

It turned out to be utterly unnecessary.  Two people can lift the boat hull with great ease, and using the ropes would have meant doing the flipping inside the garage.  Seeing that the boat's beam is almost six feet, that would have been awkward (it would have hit the garage door opener overhead).  The guys therefore decided on the spot to ignore the ropes, lift the hull, walk it outside and flip it manually.  It took almost no time.  It was a revelation to finally see the inside, after only a few glimpses while clambering underneath.  Ah yes, and it became clear that the trailer is too small.  Designed for a personal water craft, the trailer is fine for my little 11' 6" (3.26 meter) first boat, the good ship Robin.  But Aerie is 15 feet long, and the trailer, while fine as a building platform, will not be safe enough on the road.  You can see two "after" photos, inside and out.  By the way, the strip at the sheer was left unpainted to receive the 2-inch-wide oak rubrails.  Next I will be giving the inside a coat of epoxy, gluing in the inwales, filleting some seams, and putting in the bench tops.

So, I hear you say, where are the "during" pictures?  Well, my camera ran out of juice at the wrong time.  Fortunately, my daughter Georgia is visiting from San Francisco, and she took some great photos with her camera.  Unfortunately, she didn't bring the little USB cable so I can't upload them.  We'll have to wait until she goes back and e-mails the photos.  So, as usual,

keep checking 176inches!

boatbuilder

Sunday, August 7, 2011

Epoxy and paint

 The past week has been devoted to filling, puttying,  sanding and coating with epoxy.  As I've already confessed, sanding is my least favorite activity, so a purist would be able to look around and find many small flaws.  I don't care.  After many passes of setting nails, filling with filleting compound, sanding, more filling, more sanding, etc., then some final spot touching up with wood putty, then more sanding, came the time to call a halt to it and coat with epoxy.

Word to the wise: working with filleting compound (epoxy mixed with wood flour) is a pain.  It starts getting stiff very soon, and requires a lot of sanding afterwords.  If it is allowed to cure for more than 48 hours, it's very hard to sand level to the wood.  On the other hand, it's extremely strong and adds to the structural integrity of the boat.  The scarfed joints of the strakes, 8 in total, benefited a lot from filleting compound, since they were far from perfect to begin with.  With a bit of wood putty at the end they will be completely hidden once the paint goes on.

So here is the boat after the second and final coat of epoxy, which has brought out the beauty of the wood and gleams blindingly.  Too bad it will be covered with paint, but it gives an idea of what the inside parts (benches, lockers, thwart, floor, splash guards, CB case), which will be left natural, will look like.

This coming week I will give the hull two coats of paint, after some light sanding.  Then I will flip the boat right-side-up onto its trailer (which I hope will be big enough) so I can work on the inside.  The flipping will be done with a few friends and neighbors, perhaps with the aid of a canoe hoist that I attached to the ceiling of the garage years ago.  I promised to pay them in beer.

So check 176inches in a week or so for more pictures and stuff.

boatbuilder

Wednesday, July 27, 2011

Skeg, keel and all

I spent the last two weeks mostly doing things that are neither glamorous nor spectacular, namely trimming strakes and filling seams with filleting compound (epoxy and wood flour).  Then in the last few days I put on the skeg, keel and bow trim.

The skeg (on the right) was cut and laminated from two layers of 3/8 inch (9mm) plywood.  It was screwed and glued on with some difficulty (and with my wife's help), since I had to duck under the boat and drive the screws from below through the keelson.  Once that was done, I reinforced the bottom of the skeg with a 3/4 x 1 inch length of solid oak. 

Then I screwed and glued a strip of 3/4 x 1 inch oak along the rest of the boat's bottom.  It's a little small to call it a keel, but really that's what it is--a sacrifice keel to be precise.  It's there mainly to stop rocks and other stuff damaging the bottom.

Then I put on the bow trim.  As I said before, the bow was angular, so I used the trim to give it a nice rounded shape (left).  This I achieved with two 3/4 x 1 inch pieces and one 3/4 x 2 inch piece.  The latter was the one that was cut and sanded to achieve the necessary curvature.  Skeg reinforcement, sacrifice keel and bow trim were all secured with bronze screws from the outside.  They are recessed and the holes will be filled along with all other holes, gaps and blemishes.  Throughout I was once again reminded of how hard oak is, with several screws inevitably getting stripped or broken.

The final photo shows the entire boat.  It is ready for recessing the last nails (I have done over half), filling all holes etc., sanding, two coats of epoxy and two coats of paint.  I chose the most standard paint I could find (which happens to be one of the cheapest too): Rustoleum topside boat enamel, navy blue high gloss for the bottom, white semi-gloss for the fore and side decks.  The inside will stay natural with spar varnish.  I am not using bottom paint, since the boat will be trailered and does not need protection against gunk growing on it while sitting in the water.  The colors were chosen to reflect the colors of the Greek flag, and they are (along with the brand of paint) standard and ubiquitous: fancier paint is less likely to be around when I need to repaint the boat.

So there we have it.  Next time the plywood and oak will look smooth and uniform in their gleaming epoxied form,  and after that shiny and positively naval in blue paint.

Until then, keep checking 176inches.

boatbuilder


Tuesday, July 12, 2011

Back from Greece

The last two weeks I was in Greece, mostly on vacation but taking care of some family business too (as usual).  So I didn't do any work on the boat but heck, I needed the vacation and the inspiration to continue, since the plan is to take the boat there when I retire (eventually).  It will obviously cost far more to ship it than to build it, but if it's part of a half-containerload of stuff we may be moving anyway I'll be able to justify it.

There was plenty of inspiration from the beautiful beaches and the sea, which ranges in color from the purest, palest aquamarine to the deepest indigo, depending on depth, weather and what's on the bottom.  When crossing on the ferry I am always reminded of Homer's frequent reference to sailing "on the wine-dark sea" (epi oinopa ponton).  This is very appropriate since the island has had a reputation since early antiquity for superlative wine.  The house we built for our retirement sits on what used to be a vineyard for three generations, up to my grandfather who passed away in 1963.  He was a Greek Orthodox priest and my strongest memories of him are olfactory: a mixture of incense, sweat (from toiling in the fields in a black cassock) and ouzo, which he distilled in copious quantities and partook of in moderation.

While swimming at a different beach every day, I was always aware of wind and wave and made mental calculations of  what it would be like to hop from beach to beach.  The island's circumference is about 60 miles, with dozens of beaches, many more-or-less inaccessible by car.  However, I didn't get much inspiration from other sailors.  I am in my fifties but I do not remember seeing a single traditional boat with sails when I was young: motors had already eclipsed sails.  The occasional sailing yacht makes an appearance but none seem to be from the island.  What I did see was perhaps the sorriest spectacle of lubberly incompetence I had ever seen, in what is arguably the most stunning cove and beach on the island.  A group of tourists (from some Balkan country by the sound of them) had rented a sweet little catamaran built on inflatable pontoons.  Using a large outboard they moved it from its mooring, through the swimmers (I almost called the police for the brazen breach of safety) to the beach.  There they proceeded to hoist the mainsail (a tall, narrow, fully-battened Mylar affair) and unfurl the jib.  Then they used the outboard to move part way up the cove, cut the motor and started sailing straight for the rocks.  Clearly they had no more than a vague idea about how to tack, and I suspect that they hadn't even deployed the very small centerboard.  They brought the jib over but did not put the helm to the lee, or the helm did not obey.  In the nick of time they fired up the outboard and managed to exit the bay.  Then they spent the next hour or two making approximately 20 feet of headway, until they ran out of patience and motored back in.  All in all, a waste of boat, wind, water and beautiful scenery.


Hopefully my boat will do better in that setting.  BTW, I thought of calling it Aerie (every one of the four vowels is pronounced separately in Greek), after a Homeric name for the island which means airy or breezy.  I may be mixing Ionic and Attic dialects of ancient Greek in spelling it thus, but I like the sound, look and concept of the name.  We'll see.

This coming weekend I'll be resuming my work, so keep checking 176inches.

boatbuilder

Saturday, June 25, 2011

Sheer Strake


Well, here we are.  The fourth and final strake, at the boat's sheer, is on.  No problems or big insights to report, I got better at it as time went on.  I still need to trim, add more filleting compound at the seams, and recess the nails before I start finishing the bottom.  On the bow photo you can (barely) see the bow piece protruding a little on the top side (bottom in the photo since the boat is being built upside-down).  That protrusion is there in case I decide to rig the boat as a sloop: the bowsprit will be secured to it with a pin.

The second photo shows the transom.  The last strake has not been trimmed yet, nor has the curve been cut into the transom itself.  All in good time.

After putting on the final strake, I cleaned up the garage (it was a total mess) and made room for the car which had been banished outside.  The next two weeks I will be busy with other things, so there won't be any progress or updates. 

But sometime in July and early August the bottom (keel, skeg, paint and all) will hopefully be done, and it will be time to flip the boat right side up to work on the top and insides.

So don't stop checking 176inches!

boatbuilder

Saturday, June 18, 2011

Strake 3

Progress has been slow, because of a backlog of gardening and home improvement projects.  For example, last summer I replaced my porch floor, cut off the rotten bottoms of the posts holding up the porch roof and replaced them with pressure-treated wood, and installed stair rails.  Of course the pressure-treated wood had to weather for many months, so I ended up puttying, sanding, priming and painting everything this summer.  I managed to do it (took four days) just before the dry weather ended.
Anyway, I had to put in seat stringers before putting on the third strake, which meant I had to notch five of the frames.  While trying the stringers on, the scarf joints broke apart, so I had to redo them with a shallower angle.  After putting them on (picture), one of them broke again (I neglected to put a screw in the frame nearest to the joint).  Clearly the stresses on these bent stringers are heavy.

Finally I put on strake 3.  The hardest thing about lapstrake construction may be shaping the strakes so they meet at the bow exactly right.  Normally this involves planing a rabbet in both strakes.  My rabbet plane was not working properly, however, so I ended up planing and sanding a scarf instead.  It worked out fine.

One lesson that I learned, though, was that it's very nice to have a helper.  When putting on the port strake, I did it all by myself and it was slightly off, which meant that the lapped edges did not line up properly, and I had to (slightly) force them together using screws and pieces of scrap plywood.  Once the epoxy cures I'll be able to remove them. The starboard strake went on much more easily, because I enlisted my wife's help for about 5 minutes to hold one end of the strake straight.  

The fourth and final strake is ready to go on, after the epoxy cures, strake 3 is beveled with plane and sander, and the tips of the frames are notched for the inwales.  After that, it will be time to put on the skeg and keel, and finish the bottom (set the nails, putty, sand, epoxy and paint).  Then I'll need to get some friends to help me flip the boat right side up to finish the inside.  With some luck I'll be done before the cold weather sets in.

boatbuilder


Tuesday, June 7, 2011

Adventures with lapstrakes

Since last time I cut and scarfed all the rest of the long pieces: strakes 2, 3 and 4.  It involved measuring, drawing and cutting two copies each of two parts (fore and aft) of three strakes, or twelve in total.  The design program provided coordinates, which I manipulated on Excel.  When the time came to scarf and glue, I had to be extra careful not to join anything the wrong way.  I found that laying the pieces on top of each other, staggered in 2-inch steps, then using a belt sander, worked very well.  Provided, that is, that the sanding belt was coarse and very new--it's amazing how quickly the grit gets dull while scarfing.

I first beveled the edges of the garboards (strake 1 or bottom piece) to the correct angle. then nailed and glued strake 2, lapped over the beveled edge of the previous one.  Nailing along the lapped edge is a lot easier with something heavy, smooth and hard held behind it--a second person would have been good doing that but I don't have a helper, so I tap in the nails enough for them to stand up, then hold the clenching iron against the back and nail them in.  I have been filling the excess overlap gap with filleting compound (epoxy and wood four).  Here's what the boat looks like with the second strake on.  There is still trimming, sanding and nail setting/puttying to do, but that can wait.

After scarfing what I thought was strake 3, I tried it on for size, but it didn't fit.  Panicked, I concluded that I had glued the fore and aft pieces upside down--the curve of the edges looked that way.  I looked for ways to cut through the scarf, but it was clearly too strong: I would have to cut the long pieces in half and butt-join them the right way.  Before taking that drastic step, I tried to calm down and double-check.  Using the Pythagorean theorem again, I calculated what the width was supposed to be at different positions and measured the pieces.

As it turns out, the pieces I had scarfed together were strake 4, the last, top strake (at the sheer).  The pieces of strake 3 were still leaning against the wall, unscarfed.  Why I never actually labeled them and relied instead on a vague idea (strake 3 in this corner, strake 4 in that one) I cannot explain to my satisfaction, but I made a mental note for next time (and so should you).  Strakes 3 and 4 were too similar.  I had labeled fore and aft, top and bottom, but not 3 and 4.  I expect it's even easier to mess up with traditional, narrow lapstrakes, as opposed to the 4-per-side wide ones I used.

So there you have it.  Strake 3 fore and aft halves are glued together and curing as I write, and will go on next.

Until then, keep checking 176inches.

boatbuilder

Sunday, May 29, 2011

Garboard

This being a long weekend and my wife being away to take care of her sick mother, I thought I'd try to make a lot of progress.  So I am happy to report some.  I put on the keelson and then beveled it to take the bottom pieces.  I call them garboards, which is the common term for the first pieces (next to the keel) that go on when building a lapstrake boat upside down, but I wonder if that applies to a design with only four strakes per side.  Beveling a 13 foot 1X4 board to an 8 degree angle takes a lot of planing and sanding, and as you can see the garage looks like a nest of pet rabbits from the shavings.  Another look of the keelson and the centrerboard case on the right.


Then I took the plunge and cut the garboards (aka Strake 1).  I did not trust the design program and/or my own measuring and cutting skills, so I decided not to join two 4X8 plywood sheets, then cut the pieces (not enough room anyway).  So I cut the two halves separately, fit them (they were fine), then scarfed them.  I have to say that sanding is very far from my favorite activity, so I did not enjoy the scarfing, nor was it a particularly good job, but it will do (see on left).

So today was the time to commit to glue and nails.  First I had to cut a slot for the centerboard, which turned out surprisingly easy (even though I had to set the blade of the circular saw at 8 degrees).  Then I coated surfaces with epoxy, mixed more epoxy with wood flour, slathered the goo on all the joints, and nailed on the garboards, using bronze ringshank nails.  I will have to set the nails and putty the indentations, but for now let's admire the putative boat, which is looking more like a boat every day.  See also the close-up of the bottom, with the off-center centerboard slot.

By the way, if I hadn't forgotten what a pain it is working with epoxy (sticky, messy, ruins brushes, coats tools, needs a respirator which is hot, sweaty and awkward, leaves black rings around fingernails, etc.) maybe I wouldn't have started.  But now I am committed, so keep reading 176inches.

boatbuilder

Sunday, May 22, 2011

Frame assembly

This past week was very productive.  The entire skeleton of the boat is basically ready.  There it is on the right.  I started with a lot of cutting and joining.  I ripped inwales and seat stringers (tricky angles) and scarfed them together to a full sixteen feet.  I also scarfed together the keelson.  I cut a seat stringer for the transom (extra tricky, since the transom is not vertical).  Then I butt-joined the seat risers that serve as a vertical frame.  I cut round holes for inspection ports in the middle of what will be buoyancy chambers.  I glued cleats along three of their sides, and cut notches in the fourth for the transverse frames.  All this gluing went well.  I test fit everything many times.  Then I nailed the risers to the sawhorses to make sure everything stayed square and level. 

Then came the time for more gluing.  The day was very hot, and the behavior of the epoxy took me by surprise, although I should have known better.  While I was trying to attach the transom (it was messy, fighting gravity the whole time), the first batch of mixed epoxy turned very hot and solidified in no time.  You see, epoxy resin and hardener mix in an exothermic reaction, the heat of which needs to dissipate.  On a hot day it doesn't happen.  So with the next batch I put the measuring cup in a bowl of ice-water and it worked a charm.  Anyway, the fore-end assembly and the transom are on, the centerboard case is attached, and some of the frames (first and third forward of the transom) have cleats glued on that strengthen their joint with the seat risers.

All this time I was working with a respirator on, because my daughter the sculptor kept insisting (she has worked with all kinds of toxic stuff) and I kept getting throat irritation every time I used epoxy anyway.  That was fine, but on a hot day it gets sweaty, the glasses get in the way, etc.  The final ignominy was that I got some epoxy in my hair, and it was very hard to remove.

Another problem came from working alone.  Attaching the centerboard case (which is pretty heavy) to two frames was very difficult.  Trying to put screws into oak requires pilot holes of perfect length and diameter, or the screws break or strip.  Got it done, though.  

The next step is to strengthen the frame-riser joints with epoxy fillets and short cleats, and put on the keelson, which I have test-fitted already.  Then, once I bevel the keelson, I will be ready to start putting on the boat's "skin".  More fun and games, starting with scarfing together plywood sheets into 16x4 foot pieces, measuring and cutting etc.

Till next time,
boatbuilder

Saturday, May 14, 2011

Starting assembly

 Well, assembly has started (finally).  This is the bow, laminated from two layers of 9mm (3/8 inch) plywood, and the two fore bulkheads.  They are nailed and glued (with some temporary screws) to a horizontal beam that will have the mainmast hole forward of the first bulkhead.  There is also a temporary brace to hold the two bulkheads together until the keelson and inwales go on.  You can see that each bulkhead has a cedar doubler for strength and for nailing the foredeck on (much later, when the hull is built and the boat is flipped right-side-up).  The tops of the bulkheads will be rounded before that, but for now it's convenient to have straight tops to keep everything square and level, especially since the centerline of the fore-end beam is designed to be exactly horizontal.  You can also see the square opening in the main bulkhead, which will have a sliding panel for access to a large locker. The bow is angular for now, but will be rounded after the hull is built, with the addition of oak pieces.

The fore-end assembly sits on the pallet that the plywood arrived in (see Pallets and Cowboys).  Unfortunately it is a little warped and I had to make adjustments.  This pallet is a convenient size for plywood cuts and minor assembly, but the fact that I have to use it is testament to my lack of space.  I also lack tabletop space (hard to fit a table of any kind amid the gardening supplies and equipment), so the tools are all over the place and I have to tidy up periodically. 

On the right you can see all the components of the centerboard (CB) case, ready to assemble (after a second coat of epoxy on the inside).  On top is the starboard panel seen from the outside.  You can see a cleat on the top edge for strength and to glue a plywood strip (with a slot for the CB).  The bottom doubler will attach to the hull--you  can see how it was curved to fit the curvature of the boat's bottom. It will be below the floorboards.  Of course these doublers and the panels themselves had to be cut to different sizes and glued at different heights to fit around the keelson and account for the v-shape of the boat's bottom.  Once again, thank heavens for trigonometry.

Below you see the inside of the port panel of the CB case, with 7/8-inch thick oak spacers to accommodate a 3/4-inch CB.  You can also see a mock CB for fitting purposes, cut out of corrugated cardboard (it held my wife's new laptop computer).  The extra-long spacer on the left will provide support for the rowing thwart/mizzen mast step, as well as a place to put hardware for CB haul line and mainsheet.  I cut it too long so I can adjust it as needed.

Today reminded me how messy epoxy is to work with, especially the mixture thickened with wood flour.  Gloves are of little help, and hands and tools have to be cleaned every time.  The boatbuilder's best friend, white distilled vinegar, works like a charm, BTW.  As for the inevitable spills, I'm not too worried since the garage floor is coated with epoxy anyway!

To see more progress and pictures, keep reading 176inches.

boatbuilder

Sunday, May 8, 2011

Cuts and more cuts

I did put in a day's work last Sunday.  Frustratingly, I spent a long time on a dust box made of particleboard, but the underside of the table saw is complicated, the fit is not too good and the contraption picks up some but not all particles of sawdust.  I suppose I need to tinker with it a little.  I also drew and cut the seat risers and the centerboard (CB) case sides and ripped some lumber into cleats.

This weekend I cut all the pieces for the CB case.  I need to assemble it before I lay out all the frames along the seat risers, because it will connect the three middle frames and stiffen the whole structure.  The centerboard itself I will make later, out of three layers of 6mm (1/4 inch) plywood glued together.  The middle piece will have a hole cut out to be filled with lead shot, and sandwiched in between two solid pieces.  This means that I had to draw and cut a mock centerboard out of thick cardboard, to make sure it pivots properly in the CB case.  That's one of a myriad bits of extra calculation and work that comes with a home-made one-of-a-kind design.  Before I put together the CB case, I will have to give the inside two coats of epoxy.

I also cut doublers for the tops of the two fore bulkheads, and the beam that connects the bow to them.  Finally, I cut a 13-inch-square opening in the main fore bulkhead: it will have a sliding door, opening onto a storage locker.  In coming days I will epoxy and assemble the CB case; laminate the two layers of the bow together; glue the doublers to the tops of the fore bulkheads and assemble the whole fore-end (two bulkheads and bow);  and butt-join the parts of the seat risers together.  Promises, promises, I know, but the work is slower than I had hoped.  I thought it best to do all the cutting I could before I started using epoxy: it's messy work, and I have to throw away the brush after less than an hour anyway, when it succumbs to rigor mortis so to speak, so it's a good idea to do as much as possible at the same time.  Plus I needed to clean up the sawdust lest it sticks to epoxied surfaces.  That I have done, so I'm ready for the sticky stuff.  Next time there will be some photos too.

So please come back to 176inches.

boatbuilder

Saturday, April 30, 2011

Of winds and shingles

There hasn't been much progress on the boat for over a week.  I drew and cut two bow pieces, to be glued together into a 3/4 inch bow brace, on which the forward ends of the strakes will be fastened.  I also drew the seat risers, the vertical longitudinal pieces that the frames will interlock with, but did not cut them.  Hopefully I can spend some quality time with my project tomorrow (Sunday).

The reasons include the visit of my daughters, which was a lot of fun, and something that was less so.  Early on Thursday morning we were hit by the tail end of the weather system which spawned the tornadoes that devastated Arkansas, Alabama and Mississippi.  We had a couple of hours of such fierce wind that our detached garage, where I am building my boat, lost a large number of shingles.  Some things (many things, actually) take precedence over my hobbies, and I spent most of Saturday on the roof, pulling up torn shingles and nailing on new ones.  I ruined a pair of old jeans and a retired turtleneck and made a mess of my hands with roofing adhesive, but I beat the rain by about five hours--it's coming down noisily as I write.  The new shingles are only an approximate match and the repair job looks better from afar than up close, but it saved time (I expect roofers are very busy after the big storm) and money, which I can spend on my boat and other things.

So tomorrow, barring other emergencies, will see a lot of cutting.  First, a dust box for the table saw, to be connected with the shop vac, something I've been putting off for years.  Then, seat risers and centerboard trunk sides.  Then a whole lot of ripping of cedar 1X4 boards into cleats, stringers, inwales and assorted bits.  Then some epoxy coating and gluing:  I will butt-join the two parts each seat riser together, assemble the centerboard trunk, and put together the fore-end.  Then we'll see.

To follow the progress, keep reading 176inches.

boatbuilder

Friday, April 22, 2011

Cutting the frames


As it turns out, cutting the eight frames did not take too long: one morning was enough, while the ladies were out shopping.  Most of the cuts I did with a circular saw equipped with a plywood-cutting blade, with only some curved and finicky cuts done with my new jigsaw.  I don't know if that's really normal, but that plywood blade makes the plywood smoke, so I had to work with the garage door open.  On a cold and rainy morning, that made my glasses steam up while I was breathing through the dust respirator.  A pain, but safety comes first.

Here they are the eight frames, in order.  They have no notches for stringers, inwales, beams or keelson yet, and I haven't cut the curves on the tops of bulkheads and transom.  But all in good time.  The first photo shows the two forward bulkheads, and the next two frames.  The one on the right is the middle frame, but it's wider than it will be:  because of the centerboard case it will have to be split in two, but I left plenty of space for final adjustments and measurements.

The second photo shows the next three frames and the transom.  The frame on the left has the outline of the benches, and will serve as the aft wall of the watertight buoyancy compartments.  The second frame from the right will be the forward wall of the aft seat and storage locker.  The transom is on the right.
As I said before, all the frames were cut from 9mm (3/8 inch) marine plywood.  Colleagues and friends with carpentry experience but no boatbuilding experience expressed doubt about whether such thin plywood is strong enough, not to mention the hull which will be 6mm (1/4 inch).  Well, as it turns out, traditional lapstrake boats often have no permanent frames at all: they are built over temporary forms, with all the strength coming from the glued joints.  My boat's permanent frames, along with the benches and decks, will serve to strengthen and stiffen it.  Boats are curious things: they can look flimsy and be super-strong.  This boat is designed to be strengthened by every frame, strake, seat, stringer, keelson, keel, gunwale, inwale, beam, glued edge, screw and nail.  The whole will be similar to a monocoque auto body or airplane fuselage.

Or at least that's the plan.  For more adventures n boatbuilding, keep reading 176inches.

boatbuilder